Friday, August 25, 2023

Kafka setup in window

Here's a step-by-step guide on how to do it: 1. Prerequisites: Before you begin, make sure you have the following prerequisites installed on your Windows system: Java Development Kit (JDK) 8 or later: Kafka requires Java to run. You can download it from the Oracle website or use OpenJDK.

2. Download Apache Kafka:

Visit the Apache Kafka website (https://kafka.apache.org/downloads) and download the latest stable version of Kafka for Windows. Choose the "binary" download.

3. Extract Kafka:

Extract the downloaded Kafka archive to a directory of your choice. For example, you can create a folder called kafka on your C: drive and extract the contents there.

4. Configure Kafka:

Kafka requires a few configuration changes for Windows:

Open the config/server.properties file in a text editor and set the log.dirs property to a directory that exists on your Windows system. For example, log.dirs=C:/kafka/data.

5. Start ZooKeeper (Kafka dependency):

Kafka relies on Apache ZooKeeper. Open a Command Prompt and navigate to the Kafka directory.

bash
cd C:\kafka

Start ZooKeeper using the following command:

bash
.\bin\windows\zookeeper-server-start.bat .\config\zookeeper.properties

6. Start Kafka:

In a new Command Prompt window (while keeping the ZooKeeper window open), navigate to the Kafka directory again.

bash
cd C:\kafka

Start Kafka using the following command:

bash
.\bin\windows\kafka-server-start.bat .\config\server.properties

7. Create Kafka Topics:

You can use the Kafka command-line tools to create topics. For example, to create a topic named "mytopic," open a new Command Prompt window and navigate to the Kafka directory:

bash
cd C:\kafka

Run the following command to create a topic:

bash
.\bin\windows\kafka-topics.bat --create --topic mytopic --bootstrap-server localhost:9092 --partitions 1 --replication-factor 1

8. Produce and Consume Messages:

You can use the Kafka command-line tools to produce and consume messages as well. For example, to produce a message to the "mytopic" topic:

bash
.\bin\windows\kafka-console-producer.bat --topic mytopic --bootstrap-server localhost:9092

To consume messages from the "mytopic" topic:

bash
.\bin\windows\kafka-console-consumer.bat --topic mytopic --bootstrap-server localhost:9092 --from-beginning

9. Stop Kafka and ZooKeeper:

To stop Kafka and ZooKeeper, you can press Ctrl + C in their respective Command Prompt windows.

That's it! You now have a basic Kafka setup running on your Windows system for local development.



Sunday, August 6, 2023

Real-Time CPU Performance Monitoring with WebSocket Controller in Web API: A Practical Guide

 Introduction:

Efficiently monitoring CPU performance is a crucial aspect of maintaining a high-performing Web API. In this blog post, we'll explore how to implement real-time CPU performance monitoring using a WebSocket controller in your Web API project. By leveraging WebSockets, you can create a dynamic monitoring solution that provides instant insights into CPU usage and empowers you to make informed optimization decisions.


Understanding Real-Time CPU Performance Monitoring with WebSocket Controller:

A WebSocket controller in your Web API acts as a communication hub, enabling real-time data exchange between the server and clients. By implementing a WebSocket controller dedicated to CPU performance monitoring, you can continuously stream CPU metrics to connected clients, facilitating proactive performance management.


Key Benefits of WebSocket Controller for CPU Performance Monitoring:


Instant Insights: Discover how a WebSocket controller allows administrators and developers to receive real-time updates on CPU performance metrics, enabling swift identification of anomalies or performance degradation.


Proactive Optimization: Learn how real-time monitoring empowers you to take immediate action to optimize CPU usage, ensuring consistent performance and responsiveness.


Resource Efficiency: Explore how WebSocket-based monitoring minimizes resource consumption compared to polling-based approaches, leading to a more efficient use of server resources.


Interactive Monitoring: Understand how the WebSocket controller enables interactive monitoring, allowing users to visualize and analyze CPU metrics as they change.


Implementing Real-Time CPU Performance Monitoring with WebSocket Controller:

Let's dive into the step-by-step implementation of real-time CPU performance monitoring using a WebSocket controller in your Web API project:


Create WebSocket Controller:

Add a new controller class, PerformanceController.cs, to handle WebSocket connections and CPU performance monitoring:


csharp
public class PerformanceController : ApiController { [Route("api/ServerUsage")] [HttpGet] public HttpResponseMessage Get() { if (HttpContext.Current.IsWebSocketRequest) { HttpContext.Current.AcceptWebSocketRequest(ProcessWebSocket); } return Request.CreateResponse(System.Net.HttpStatusCode.SwitchingProtocols); } private async Task ProcessWebSocket(AspNetWebSocketContext context) { WebSocket webSocket = context.WebSocket; var cpuCounter = new PerformanceCounter("Processor", "% Processor Time", "_Total"); var memoryCounter = new PerformanceCounter("Memory", "Available MBytes"); while (webSocket.State == WebSocketState.Open) { // Simulate getting CPU usage data //double cpuUsage = GetCpuUsage(); cpuCounter.NextValue(); // Call this method once to initialize the counter. System.Threading.Thread.Sleep(1000); // Sleep for a second to allow the counter to collect data. var cpuUsage = cpuCounter.NextValue(); var maxCpuMemoryThresholdValue = System.Configuration.ConfigurationManager.AppSettings["MaxCpuMemoryThresholdValue"] != null ? Convert.ToDouble( System.Configuration.ConfigurationManager.AppSettings["MaxCpuMemoryThresholdValue"]) : 80.0; var memoryUsage = memoryCounter.NextValue(); // Convert CPU usage to bytes //byte[] buffer = Encoding.UTF8.GetBytes(string.Format("CPU Usage: {0}%", cpuUsage)); byte[] buffer; if (cpuUsage > maxCpuMemoryThresholdValue || memoryUsage < 100 ) // Assume the server is "slow" if CPU usage is over 80% { // Convert CPU usage to bytes buffer = Encoding.UTF8.GetBytes(string.Format("Server is under load, please retry again ( CpuUsage: {0}% and memory Usage : {1} )", cpuUsage, memoryUsage)); //return Ok(new { status = "Server is slow", cpuUsage }); } else buffer = Encoding.UTF8.GetBytes(string.Format("Server is running normally, CpuUsage: {0}% and memory Usage : {1} )", cpuUsage, memoryUsage)); // Send CPU usage data to the connected client await webSocket.SendAsync(new ArraySegment<byte>(buffer), WebSocketMessageType.Text, true, CancellationToken.None); // Delay for a while before sending the next update await Task.Delay(TimeSpan.FromSeconds(7)); } } }

Conclusion:
By implementing a WebSocket controller for real-time CPU performance monitoring, you can create a dynamic and interactive monitoring solution within your Web API. This implementation guide has walked you through setting up a WebSocket controller, simulating CPU metrics, and establishing real-time communication with clients. By leveraging WebSocket technology, you can gain immediate insights into CPU usage, optimize performance, and ensure the efficient operation of your Web API. Embrace the power of WebSocket controllers to take your CPU performance monitoring to the next level.


Simplifying Web API Maintenance with OWIN Context-Based Middleware

Introduction:

In the world of Web API development, maintaining a robust and responsive application is crucial. As part of your maintenance strategy, leveraging OWIN context-based middleware can be a game-changer. In this blog post, we'll explore the use of OWIN context-based middleware for handling maintenance tasks in your Web API, ensuring a seamless user experience during updates and improvements.


Understanding OWIN Context-Based Middleware:

OWIN (Open Web Interface for .NET) provides a flexible foundation for building web applications and APIs. OWIN context-based middleware allows you to intercept and modify requests and responses as they flow through your application, making it an ideal choice for implementing maintenance-related features.


Key Features and Benefits:


Maintenance Mode Activation: Learn how to use OWIN context-based middleware to activate maintenance mode, redirecting requests to a custom maintenance page or displaying informative messages to users.


Customization and Flexibility: Explore the power of OWIN context-based middleware to create highly customizable maintenance behaviors, catering to specific requirements of your Web API.


Scheduled Maintenance: Discover how to implement scheduled maintenance windows using OWIN middleware, enabling you to proactively manage updates without disrupting user experience.


Exception Handling: Learn how to handle exceptions that may arise during maintenance tasks, ensuring graceful error handling and seamless recovery.


Implementing OWIN Context-Based Maintenance Middleware:

Let's dive into a practical implementation of maintenance middleware using OWIN context-based approach:


Create MaintenanceMiddleware.cs:

Create a new class, MaintenanceMiddleware.cs, to handle maintenance mode logic:

using System; using System.Threading.Tasks; using Microsoft.Owin; namespace YourWebApi.Middleware { public class MaintenanceMiddleware : OwinMiddleware { public MaintenanceMiddleware(OwinMiddleware next) : base(next) { } public override async Task Invoke(IOwinContext context) { if (IsMaintenanceModeEnabled()) { // Display maintenance message or redirect to maintenance page context.Response.StatusCode = 503; await context.Response.WriteAsync("We are currently undergoing maintenance. Please check back later."); return; } // Continue with the next middleware in the pipeline await Next.Invoke(context); } private bool IsMaintenanceModeEnabled() { // Implement your logic to determine if maintenance mode is enabled return false; } } }


Configure OWIN Middleware:
In your Startup.cs file, configure the OWIN middleware pipeline to use MaintenanceMiddleware:

csharp
using Microsoft.Owin; using Owin; using YourWebApi.Middleware; [assembly: OwinStartup(typeof(YourWebApi.Startup))] namespace YourWebApi { public class Startup { public void Configuration(IAppBuilder app) { app.Use<MaintenanceMiddleware>(); // Other OWIN middleware and configuration } } }


    Customize Maintenance Behavior: Modify the MaintenanceMiddleware class to tailor it to your maintenance requirements, such as custom messages, redirection, or scheduled maintenance checks.
    Conclusion: OWIN context-based middleware offers a powerful and flexible way to manage maintenance tasks in your Web API. By following the steps outlined in this blog post and adapting the OWIN context-based middleware to your specific needs, you can ensure that your Web API remains reliable, responsive, and user-friendly even during maintenance activities. Whether you're implementing maintenance mode, displaying informative messages, or handling exceptions gracefully, OWIN context-based middleware empowers you to maintain a seamless user experience while ensuring the health of your Web API.


    Mastering Resilience with RetryMiddleware in Web API Development

     Introduction:

    In the dynamic realm of Web API development, ensuring the reliability and responsiveness of your applications is a top priority. To achieve this, developers often employ various strategies, one of which is the intelligent use of middleware. In this blog post, we'll explore the powerful RetryMiddleware and how it can elevate the resilience of your Web API, ensuring smooth operations even in the face of transient failures.


    Understanding RetryMiddleware:

    RetryMiddleware is a middleware component designed to automatically handle transient failures that can occur when interacting with external services, databases, or APIs. Instead of letting these failures lead to complete disruptions, RetryMiddleware empowers your Web API to gracefully handle and recover from such issues by retrying the failed operations.


    Key Features and Benefits:


    Automatic Retry: Learn how RetryMiddleware detects and responds to transient failures by automatically retrying failed requests, reducing the need for manual intervention.


    Customizable Retry Strategies: Explore the flexibility of RetryMiddleware in configuring different retry strategies, including exponential backoff, fixed interval, and more, based on the nature of the failure and the external service being accessed.


    Error Handling and Logging: Understand how RetryMiddleware can be configured to capture and log relevant error details, providing valuable insights into the nature of failures and helping you troubleshoot issues more effectively.


    Circuit Breaker Integration: Discover how RetryMiddleware can be combined with a circuit breaker pattern to further enhance the resilience of your Web API by temporarily disabling requests to a failing service, allowing it time to recover.


    Implementing RetryMiddleware in Your Web API Project:


    Integration and Configuration: Step-by-step guide on how to seamlessly integrate RetryMiddleware into your Web API project, including adding it to the middleware pipeline and configuring its behavior.


    Handling Different Scenarios: Learn how to apply RetryMiddleware to various scenarios, such as database connections, third-party API calls, and more, ensuring your Web API can gracefully recover from transient errors across different components.


    Tuning Retry Strategies: Dive into the details of selecting and fine-tuning the appropriate retry strategy based on the specific characteristics of the external service and the anticipated failure scenarios.


    Monitoring and Metrics: Explore how to monitor the effectiveness of RetryMiddleware through the collection of relevant metrics, allowing you to gauge the impact of retries on the overall system performance.


    Best Practices: Discover best practices for incorporating RetryMiddleware into your Web API development process, including optimal retry limits, handling exceptional cases, and maintaining a balance between retries and overall system responsiveness.


    Implementing RetryMiddleware in Your Web API Project:

    Let's walk through the steps to integrate RetryMiddleware into your Web API project using a practical example.

    1. Install Required Packages:
    bash
    dotnet add package Microsoft.Extensions.Http.Polly


    public class RetryMiddleware
        {
             private readonly Func<IDictionary<string, object>, Task> _next;
            private readonly int _maxRetries;
            private readonly int[] _retryStatusCode;
            private readonly TimeSpan _retryDelay;

            public RetryMiddleware(Func<IDictionary<string, object>, Task> next, int maxRetries, TimeSpan retryDelay)
            {
                _next = next;
                _maxRetries = maxRetries;
                _retryStatusCode = new []{ 501, 502, 504, 505, 429,503};
                _retryDelay = retryDelay;
            }

            public async Task Invoke(IDictionary<string, object> environment)
            {
                var owinContext = new OwinContext(environment);
                int retryCount = 0;

                while (retryCount < _maxRetries)
                {
                    await _next(environment);

                    if (_retryStatusCode.Contains(owinContext.Response.StatusCode))
                    {
                        await Task.Delay(_retryDelay);
                        retryCount++;
                    }
                    else
                    {
                        break;
                    }
                }
            }

        }


    Add middleware in startup 

     app.Use<RetryMiddleware>( 3, TimeSpan.FromSeconds(1));


    Conclusion: RetryMiddleware is a valuable tool for enhancing the resilience of your Web API by automating the process of recovering from transient failures. By following the steps outlined in this blog post and implementing RetryMiddleware in your Web API project, you can ensure that your application gracefully handles temporary issues and provides a seamless experience for your users. Experiment with different retry strategies, monitor the results, and fine-tune your implementation to optimize the resilience of your Web API.


    Monday, July 31, 2023

    Application Insight For An Existing ASP.NET Web Application


    This article will guide you to add Application Insight on Azure for an existing ASP.NET Web Application. If you are starting a new project or have an existing Web Application and want to use Application Insights, Visual Studio 2013 and later now has a built-in capability to add Application Insights to your Application.

    Step 1


    Open “MyWebsite” ASP.NET Web Application in Visual studio 2013.

    Note

    This is an existing ASP.NET Web Application, which you already have and you want to add “Application Insights” to capture telemetry data.

    Step 2 

    Add Microsoft.ApplicationInsights.Web package from nuget package manager

    https://www.nuget.org/packages/Microsoft.ApplicationInsights.Web

    This package is required .Net framework 4.6.1 or greater version 

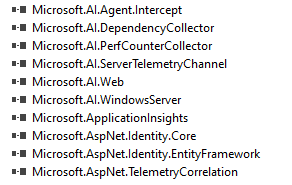
    it will add following dependency in project and add applicationinsight.config in root path 


    Open Web.config file and check the modules added to the configuration.


     Add InstrumentationKey key at the top in  ApplicationInsight.config 


    Part 7 — Enterprise RAG Reference Architecture

      "Architecture is not about connecting components. It is about defining responsibilities that can evolve independently." Welcome ...